Blank walls are wasted opportunities. They’re the largest uninterrupted surface in most rooms, yet they often get a coat of beige paint and nothing else. Treating walls as an afterthought leaves a space feeling unfinished, even if the furniture and flooring are spot-on. The right wall treatment changes how a room feels, it adds personality, directs attention, and can even make ceilings look higher or narrow rooms feel wider. This guide walks through practical, buildable wall decor options that go beyond the basic framed print, with a focus on techniques and materials that homeowners can source, install, and customize themselves.
Table of Contents
ToggleKey Takeaways
- Unique wall decor transforms blank spaces into intentional focal points that reflect personal style, solve practical problems like hiding imperfections, and can even make rooms feel larger or ceilings appear higher.
- Textured wall installations such as board and batten, 3D panels, and shiplap add dimension and visual depth without requiring extensive construction skills or permanent structural changes.
- Natural materials like reclaimed wood, cork tiles, and rope wrapping bring warmth and character to walls while offering practical benefits like sound dampening and durability in high-traffic areas.
- Gallery walls gain fresh appeal when layered with mixed frame depths, floor-to-ceiling layouts, alternative hanging methods like clipboards, and asymmetrical organic clusters rather than rigid grids.
- Statement mirrors and reflective surfaces, especially oversized or arched styles, multiply light and perceived space while adding architectural sophistication to any room.
- Unexpected wall objects—vintage tools, textiles, architectural salvage, collections, and plate walls—become focal points when properly mounted and arranged, turning functional items and personal collections into curated design features.
Why Unique Wall Decor Matters for Your Home
Wall decor sets the tone before anyone notices the furniture. It’s the backdrop for daily life, the surface behind video calls, family dinners, and late-night reading sessions. Generic choices like builder-grade paint or mass-produced canvas prints do the job, but they don’t tell a story or reflect how someone actually lives.
Unique wall treatments also solve practical problems. Textured installations can hide imperfections in drywall that would otherwise require extensive patching and sanding. Reflective surfaces bounce light into dim corners, reducing the need for additional fixtures. Vertical elements draw the eye upward, making standard eight-foot ceilings feel taller.
From a resale perspective, memorable wall decor can differentiate a listing. Buyers remember the home with the reclaimed wood accent wall or the floor-to-ceiling gallery grid. It’s not about permanent changes, most of the methods covered here are removable or paintable if tastes shift. But while they’re up, they make a space feel intentional.
Textured Wall Installations That Add Dimension
Flat drywall is functional, but it’s visually silent. Adding physical texture creates shadows, depth, and a tactile quality that shifts with changing light throughout the day.
Board and batten is one of the most accessible texture upgrades. It uses vertical 1×2 or 1×3 boards spaced evenly over a wall, with a horizontal rail at chair height or mid-wall. Actual dimensional lumber is 3/4 inch thick, which creates enough relief to cast shadows without protruding awkwardly into the room. Attach boards to studs with 18-gauge brad nails or construction adhesive, then caulk seams and paint everything the same color for a cohesive look. Dark colors emphasize the shadow lines: light colors soften them.
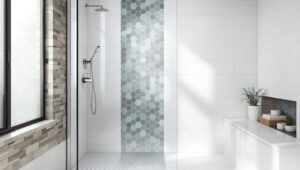
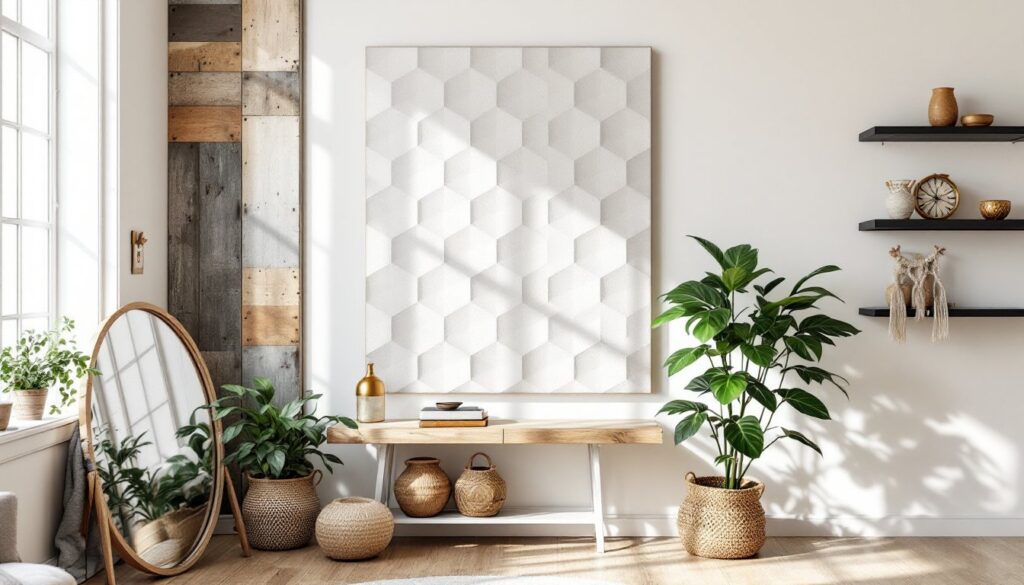
3D wall panels made from MDF, PVC, or plant fiber offer geometric patterns, waves, hexagons, stacked blocks, without custom carpentry. Panels typically come in 2×2-foot squares and install with panel adhesive or finishing nails. They’re paintable and lightweight, though cheaper versions can look obviously synthetic up close. These work well as accent features behind a bed or sofa, not whole-room coverage.
Shiplap or tongue-and-groove paneling runs horizontally and gives a farmhouse or coastal feel depending on finish. Real wood shiplap (often 1×6 pine) costs more and requires acclimation to room humidity for 48 hours before install to prevent gaps or buckling. Nickel gaps between boards are traditional, but tight joints work too. MDF versions are cheaper and more dimensionally stable but can’t handle moisture, so skip them in bathrooms.
Natural Elements and Organic Materials
Bringing raw or lightly processed materials indoors adds warmth that painted surfaces can’t match. Reclaimed wood planks, often sourced from old barns, pallets, or fencing, carry color variation, nail holes, and weathering that new lumber lacks. Before installing, inspect for protruding nails, splinters, and insect damage. A quick pass with a palm sander (120-grit) smooths rough edges without erasing character. Attach planks horizontally, vertically, or in herringbone patterns using a pneumatic nailer and 1.5-inch brad nails into studs.
Cork tiles offer sound dampening and a soft, grainy texture. They come in 12×12-inch squares with peel-and-stick backing or as loose tiles requiring adhesive. Cork is naturally antimicrobial and handles humidity well, making it suitable for kitchens or home offices where wall-mounted items get rearranged often, pushpins don’t leave permanent damage. It’s not load-bearing, so don’t expect it to support heavy shelving.
Rope or jute wrapping works for columns, half-walls, or small accent sections. Use sisal rope (1/4 to 1/2 inch thick) and start at the bottom, securing the end with a few dabs of hot glue or small finishing nails. Wrap tightly upward, keeping coils flush. This technique is labor-intensive but costs under $40 for an average column. It’s a good project for anyone comfortable with repetitive handwork.
Gallery Walls with a Twist
Gallery walls have been a go-to for years, but the standard grid of black frames has become predictable. Small tweaks make the concept feel custom.
Mixed frame depths create a layered effect. Combine shadow box frames (2 to 3 inches deep) with standard 3/4-inch frames and a few floating shelves. This breaks up the flat plane and lets dimensional objects, small sculptures, vintage cameras, pressed botanicals, sit alongside prints. Use a laser level to establish a horizontal baseline, then arrange pieces with varying top edges rather than uniform alignment.
Floor-to-ceiling layouts maximize vertical space and work especially well in rooms with high ceilings. Start 6 inches above the baseboard and extend to within a foot of the ceiling. This draws the eye upward and makes the room feel taller. Anchor the layout with larger pieces at eye level (around 60 inches from the floor) and fill in around them with smaller works. This approach benefits from decorating ideas and techniques that emphasize balance and proportion.
Clipboards, plate hangers, or industrial clips replace traditional frames. Mount a row of matte black clipboards with Command picture-hanging strips (rated for the clipboard weight plus the art) and swap out prints seasonally. Alternatively, use disc plate hangers with spring tension to hold flat objects, vinyl records, embroidery hoops, even thin cutting boards with graphic designs. Adjust tension screws so the hanger grips securely without warping the item.
Asymmetrical organic clusters mimic how items naturally accumulate rather than forcing a grid. Lay pieces on the floor first, arranging them until negative space feels balanced. Leave 2 to 4 inches between frames. Trace each piece on kraft paper, tape the paper templates to the wall, and mark nail holes through the paper before removing templates. This avoids extra holes from trial and error.
Statement Mirrors and Reflective Surfaces
Mirrors aren’t just functional, they’re architectural tools that manipulate light and perceived space. Oversized mirrors (anything over 36 inches in one dimension) anchor a wall and reflect windows or light fixtures, multiplying brightness.
Arched mirrors are trending in 2026, especially full-length versions leaning against a wall rather than hung. A 6 to 7-foot arched mirror leans at a slight angle, secured at the base with furniture anchors screwed into studs to prevent tipping. This works in entryways, bedrooms, or at the end of a hallway to visually extend the space.
Antiqued or tinted mirror panels offer a softer reflection than standard clear glass. Bronze, smoked gray, or champagne tints reduce glare and add a vintage feel. These often come as peel-and-stick mirror tiles in 12×12-inch squares, installed in a grid or offset brick pattern. The adhesive holds on smooth, painted drywall but may fail on textured surfaces. For a more permanent install, use mirror mastic adhesive and press firmly for 30 seconds per tile.
Clustered convex mirrors (sometimes called porthole or fish-eye mirrors) create a sculptural grouping. Vary sizes from 8 to 16 inches in diameter and mount them in an organic cluster. The convex surface warps reflections in an interesting way, and the frames, brass, black steel, or natural wood, add material contrast. Use anchors rated for 10 pounds per mirror, even if individual mirrors weigh less: the cantilevered weight from the mounting point increases stress on the anchor.
Reflective surfaces aren’t limited to glass. Polished metal tiles (stainless, copper, or brass) add industrial texture and catch light without a mirror’s clarity. Acrylic mirror sheets are lighter and safer than glass, ideal for kids’ rooms or renters who want a temporary install with double-sided mounting tape. Acrylic scratches easily, so handle with microfiber cloths and avoid abrasive cleaners.
DIY Wall Decor Projects for Creative Homeowners
Building your own wall decor lets you control scale, color, and materials while keeping costs low. These projects assume basic tool access and moderate skill.
Large-scale abstract art on plywood starts with a 4×8-foot sheet of 3/4-inch sanded plywood, cut to desired size at the lumberyard (many will do this for free). Sand edges smooth, prime with latex primer, then apply acrylic paint in bold geometric blocks or organic shapes. Use painter’s tape for clean lines and a 4-inch foam roller for smooth coverage. Seal with matte or satin polyurethane if the piece will be in a high-traffic area. Mount with Z-bar hangers (also called French cleats) for a flush, secure installation that distributes weight across studs.
Macramé wall hangings require only cotton cord (3 to 5mm thickness), a dowel or branch for hanging, and patience. Basic knots, square knots, half-hitch, and lark’s head, combine into patterns ranging from simple fringe to intricate geometric webs. A beginner piece takes 4 to 6 hours: detailed designs can take days. Tutorials for how to find decorating inspiration through DIY projects are widely available and help refine technique.
Pressed botanical frames preserve foliage in a way that lasts years. Collect leaves, ferns, or flowers and press them between sheets of absorbent paper (newsprint or blotting paper) inside heavy books for two weeks. Once fully dry, arrange on acid-free mat board and secure with tiny dots of craft glue or by sandwiching between glass and backing in a frame. This works best with flat specimens, thick blooms like roses don’t press well.
Stenciled accent walls use Mylar stencils (reusable and easy to clean) and foam pouncers or stencil brushes to apply paint in repeating patterns. Secure the stencil with low-tack painter’s tape and use minimal paint on the brush, too much causes bleed under the stencil edges. Moroccan geometric patterns, oversized florals, or mid-century starbursts all work. Expect to spend 8 to 12 hours on a standard bedroom wall, including drying time between repeats.
Unexpected Objects as Wall Art
Not everything on a wall needs to be a picture. Functional objects, collections, and architectural salvage can become focal points with the right mounting strategy.
Vintage tools or instruments tell a story and add sculptural interest. An old hand saw, a set of wooden pulleys, or a banjo mounted on the wall brings texture and history. Use heavy-duty picture hangers or masonry screws into studs for items over 5 pounds. Group similar items by material or era, a collection of hand planes, a row of antique levels, to create cohesion.
Textile hangings like quilts, rugs, or woven blankets soften hard surfaces and add color. Hang textiles with a sleeve sewn into the back and a dowel or curtain rod threaded through, or use a quilt hanger with wooden slats that clamp the top edge. Avoid nails or tacks directly through fabric, they create permanent holes and stress points. Rotate pieces seasonally to prevent fading if the wall gets direct sun.
Architectural salvage pieces, corbels, ceiling tin, window frames, iron gates, mount as sculptural elements. Ceiling tin panels from old buildings often have embossed patterns and a patina of age. Mount with panel adhesive or screws through existing nail holes. Old window frames (glass removed for safety) can frame mirrors, corkboard, or fabric instead of traditional art. Clean thoroughly and stabilize loose joints with wood glue before hanging.
Floating shelves displaying collections turn small objects into curated displays. A series of shallow shadow boxes (3 to 4 inches deep) holds vintage cameras, small succulents, or ceramic pieces without cluttering horizontal surfaces. Arrange boxes in a grid or asymmetrical cluster depending on the room’s style. This approach aligns with top decorating ideas that emphasize personal collections as design features.
Plate walls move decorative dishware off shelves and into view. Use disc plate hangers with adjustable springs for plates up to 12 inches in diameter, or adhesive disc hangers that stick to the back of plates for a more invisible mount. Arrange plates by color gradient, size progression, or mixed patterns for an eclectic look. According to design trends highlighted by experts at House Beautiful, plate walls are gaining traction as a way to blend vintage charm with modern interiors. Ensure hangers are rated for the plate weight, ceramic and stoneware are heavier than they look.
Woven baskets in varying sizes create a textured, organic display. Flat-backed baskets mount easily with small finishing nails through the weave or with Command strips rated for the basket’s weight. Natural tones, seagrass, rattan, or sweetgrass, layer well together. This works especially well in dining rooms, kitchens, or entryways where the texture complements wood furniture.
For those seeking fresh approaches to room styling, Decoist offers extensive galleries of modern wall decor applications across various home styles. Budget-conscious DIYers can explore step-by-step wall projects at Addicted 2 Decorating, where room makeovers often feature creative use of everyday materials. Pairing these unexpected objects with decorating ideas and tips ensures installations feel deliberate rather than cluttered.