A TV feature wall turns a plain viewing area into a standout focal point. Instead of a floating screen against bland drywall, it gives the television a designed backdrop, grounding the room’s layout and elevating its visual appeal. Whether someone’s working with a compact apartment or a sprawling family room, a dedicated feature wall solves the common problem of a mounted TV looking like an afterthought. It integrates technology into the room’s design language, adds texture or color contrast, and often provides functional storage. This guide walks through proven techniques, materials, and design approaches that work in real spaces.
Table of Contents
ToggleKey Takeaways
- A TV feature wall transforms a mounted screen into an intentional focal point by adding material, color, texture, or built-ins that anchor the room’s design and prevent the television from looking like an afterthought.
- Wood paneling (shiplap, MDF, or 3D panels) and stone or brick veneer are popular material choices for TV feature walls, with costs ranging from $0.60/sq ft for budget MDF to $12/sq ft for quality brick veneers.
- Built-in shelving and entertainment units require intermediate to advanced carpentry skills but offer functional storage for AV equipment, books, and décor while creating a unified design frame around the television.
- Paint and wallpaper are the quickest and most budget-friendly TV feature wall options, with bold accent colors, color blocking, and large-scale patterns effectively framing the screen without structural work.
- Strategic LED strip lighting placed behind or along the sides of a TV feature wall reduces eye strain, enhances texture visibility, and can be controlled via smart home systems for movie or gaming modes.
- Proper planning—including viewing distance (7–10 feet for 55–65-inch TVs), wall location away from glare, and pre-installation structural checks—ensures your TV feature wall enhances both aesthetics and functionality.
What Is a TV Feature Wall and Why Should You Create One?
A TV feature wall is a single wall treated differently from the others, through material, color, texture, or built-ins, to create a visual anchor around the television. It serves both aesthetic and practical functions.
From a design standpoint, it draws the eye intentionally rather than letting the black rectangle dominate. It balances the room by adding depth, warmth, or contrast. Functionally, it can hide cables, house AV equipment, or provide display space for décor.
Building one doesn’t require structural changes in most cases. It’s cosmetic work, adding surface treatments, mounting panels, or installing prefabricated units. That makes it accessible for intermediate DIYers. But, if the wall is load-bearing or if electrical routing is involved (for recessed outlets or in-wall cable management), checking local building codes and possibly pulling a permit is necessary. Most jurisdictions require permits for electrical work beyond simple outlet replacement.
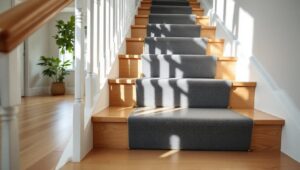
The wall’s location matters. Ideally, it’s opposite or perpendicular to main seating and away from direct sunlight that causes glare. Measure the viewing distance: for a 55-inch TV, a seating distance of 7–9 feet is standard: for 65 inches, 8–10 feet. The feature wall should enhance that sightline, not fight it.
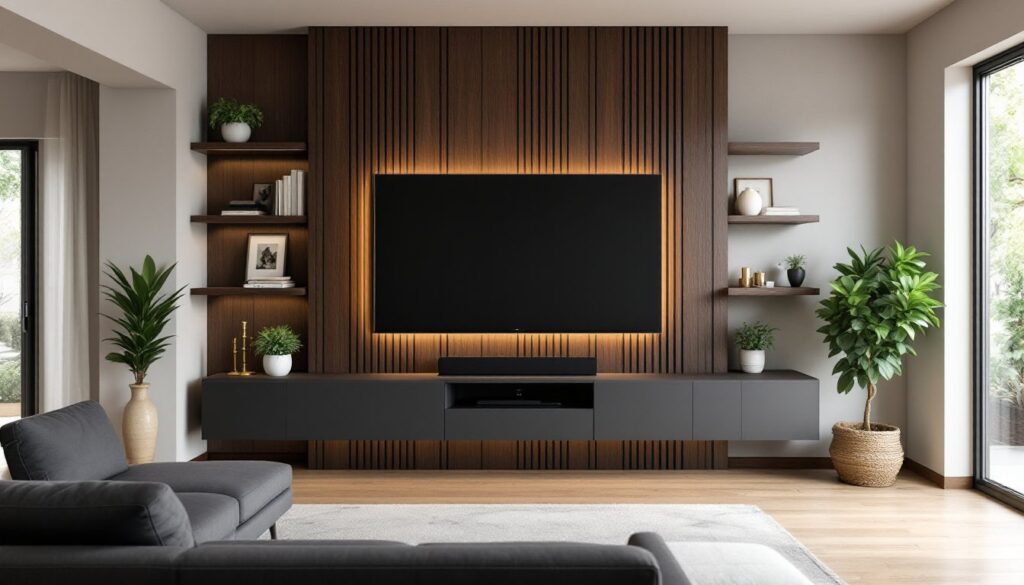
Wood Paneling and Textured Accent Walls
Wood is a go-to for adding warmth and dimension. Horizontal planking, vertical shiplap, or geometric panel layouts all work, each shifts the room’s visual flow differently.
Material options:
- Shiplap or tongue-and-groove: Real pine or cedar boards (nominal 1×6 or 1×8, actual ¾” x 5½” or 7¼”) deliver authentic texture. Expect to pay $1.50–$4 per linear foot depending on wood grade and region.
- MDF paneling: Pre-primed sheets or slatted panels cost less ($0.60–$1.20/sq ft) and install faster. They lack wood grain but paint well and stay stable in climate-controlled spaces.
- 3D wall panels: PVC or wood composite tiles create shadow lines and depth. These snap or glue onto drywall and typically cover 10–12 sq ft per box.
Installation basics:
- Find the studs using a stud finder. Mark them with painter’s tape.
- Level the first board at your starting height (usually floor level or a few inches above baseboard). Use a 4-foot level.
- Secure with finish nailers or construction adhesive. For real wood, 18-gauge brad nails into studs work. MDF can use adhesive (like Loctite PL Premium) plus a few nails for hold.
- Mind expansion gaps. Wood moves. Leave 1/8″ at walls and ceiling if using solid lumber.
- Pre-drill holes for TV mounting hardware before final installation if possible.
For a more contemporary look, interior design trends often favor dark-stained walnut or charcoal-painted slats running vertically to add height. A matte sealant protects the finish without adding gloss that reflects TV light.
Stone and Brick Feature Walls for Rustic Elegance
Natural or manufactured stone brings texture and a high-end feel. Real stone veneer and brick are heavy, check that the wall framing can support the added load (typically 12–15 lbs per sq ft for thin veneer). Most standard stud walls (16″ on-center with ½” drywall) handle it, but older plaster-and-lath or metal stud walls may need reinforcement.
Stone veneer: Thin-cut natural stone (slate, quartzite, limestone) or cast stone panels. These install over a moisture barrier and metal lath using mortar. It’s a multi-day project: lath install, scratch coat, stone setting, grouting.
Brick veneer: Thin brick tiles (about ½” thick) mimic full brick but weigh far less and don’t require a foundation ledge. They bond with thinset mortar, same as tile. Expect around $6–$12 per sq ft for materials.
Faux panels: Polyurethane or fiberglass “stacked stone” panels offer realistic texture at a fraction of the weight and cost ($4–$8/sq ft). They install with construction adhesive and interlock along seams. Quality varies, inspect samples in person for believable detail.
Critical steps:
- Install a vapor barrier if applying real stone in a humid climate or over exterior walls.
- Use a notched trowel for even mortar coverage. Back-butter each stone piece.
- Work bottom-up and maintain level courses. Use spacers if uniform grout lines are desired.
- Seal natural stone with a penetrating sealer after grouting to prevent staining and moisture intrusion.
- Plan around the TV mount. Mark and install the mounting bracket before or during stone installation to ensure solid backing.
Stone pairs well with recessed or track lighting that grazes the surface, highlighting texture and shadow.
Built-In Shelving and Entertainment Units
Built-ins turn a feature wall into a full entertainment center, housing the TV, AV gear, books, and decorative objects in a unified frame. This is where the project shifts from cosmetic to carpentry. It’s doable for an experienced DIYer with a miter saw, drill, and pocket-hole jig, but it’s also a common hire-out job.
Design approaches:
- Framed alcove: Build a recessed box using 2×4 framing and finish with drywall or plywood. The TV mounts flush inside: shelves flank it.
- Floor-to-ceiling cabinetry: Hardwood plywood (¾” birch or maple) boxes with face frames. Doors hide clutter: open cubbies display décor.
- Floating shelves with a center panel: A simpler hybrid, mount thick shelves on hidden brackets and treat the wall behind the TV with a contrasting finish.
Materials breakdown:
- Plywood: ¾” for cabinet boxes, ½” for backs. A 4×8 sheet of birch runs $50–$80.
- Hardwood for face frames: Poplar or oak, nominal 1×2 or 1×3 (actual ¾” x 1½” or 2½”).
- Shelf brackets or standards: Adjustable standards offer flexibility. Fixed brackets look cleaner but lock shelf height.
- Finish: Primer and semi-gloss paint, or stain and polyurethane. Budget 350–400 sq ft coverage per gallon of paint.
Process outline:
- Measure and plan the layout on paper or in SketchUp. Account for TV dimensions, ventilation (at least 2″ clearance around components), and cable routing.
- Build cabinet boxes with pocket screws or dado joints. Use a Kreg Jig for pocket holes, faster and plenty strong for face-frame construction.
- Anchor to studs. Locate studs, then use 3″ screws through cabinet backs into framing. Check level and plumb as you go.
- Add face frames and doors if desired. Concealed Euro hinges simplify door mounting.
- Route cables through the back or sides of boxes. Install brush grommets in openings to keep it tidy.
- Finish with trim along edges and seams for a polished look. Caulk gaps before painting.
Ventilation is critical, heat from receivers and game consoles builds fast in enclosed spaces. If adding doors, consider louvered panels or small USB-powered fans.
Modern Wallpaper and Paint Techniques
Paint and wallpaper are the quickest, most budget-friendly routes to a standout TV wall. They also offer near-infinite design flexibility.
Paint techniques:
- Accent color: A bold or dark hue (navy, charcoal, forest green) behind the TV creates contrast. It makes the screen recede visually when off and pop when on. Use a matte or eggshell finish to avoid glare.
- Color blocking: Geometric shapes or horizontal bands add a modern edge. Use painter’s tape and a small foam roller for crisp lines. Pull tape at a 45-degree angle while paint is slightly tacky.
- Textured paint: Products like Behr’s Venetian plaster or Ralph Lauren’s suede finish add subtle depth. Apply with a trowel or stippling brush.
Wallpaper:
Peel-and-stick (removable) wallpaper is renter-friendly and reposition-able during install, ideal for DIY. Traditional paste wallpaper offers more premium patterns but demands precision.
- Patterns to consider: Large-scale geometric, subtle linen texture, or tone-on-tone damask. Avoid busy patterns that compete with on-screen content.
- Application: Start from the center of the wall and work outward. Use a smoothing tool (plastic squeegee) to eliminate bubbles. Trim with a sharp utility knife along baseboards and ceiling.
- Seams: Butt seams tightly, don’t overlap. Roll seams gently with a seam roller after 15 minutes.
Pro tips:
- Prime the wall first, even under peel-and-stick. It ensures even adhesion and easier removal later.
- Test a sample square for 24 hours. Some wallpapers react poorly to humid or hot walls (like those with poor insulation).
- When painting, tape off the TV mount or remove it temporarily. Overspray is hard to clean off metal hardware.
Many homeowners browsing home decorating ideas find that a single bold wallpaper wall balances well with neutral-painted adjacent walls, preventing visual overload.
Lighting Ideas to Enhance Your TV Feature Wall
Lighting transforms a feature wall from flat to dimensional. It reduces eye strain during viewing and highlights textures or materials.
LED strip lighting:
The most popular and easiest option. Adhesive-backed RGB or tunable white LED strips mount along shelves, behind the TV, or at ceiling/floor edges.
- Installation: Clean the surface, peel backing, and press into place. Connect to a plug-in transformer or hardwire to a switched outlet. Most strips are low-voltage (12V or 24V), so they’re safe and code-compliant for DIY.
- Placement behind the TV: Creates a soft glow (bias lighting) that reduces eye strain and makes blacks appear deeper. Keep the strip ½”–1″ from the wall for even diffusion.
- Color temperature: 3000K–4000K is ideal for living spaces. Avoid cool white (5000K+), which feels clinical.
Recessed lighting (cans or pucks):
If the wall is open (during construction or renovation), add recessed lights at top or sides. Aim them at the wall surface to graze texture.
- Spacing: 24″–36″ apart for even coverage.
- Dimming: Install a compatible LED dimmer (ELV or TRIAC type). Cheap dimmers cause flicker.
- Code: Most jurisdictions require a licensed electrician for new circuits and recessed cans. Work in existing boxes (like switching an outlet) is usually allowed for homeowners.
Track or picture lights:
Surface-mounted track systems or adjustable picture lights offer flexibility without cutting into drywall. They plug in or hardwire to a junction box.
Smart controls:
Integrate lighting with smart home systems (Philips Hue, LIFX, Lutron Caseta) for scenes, dim for movie mode, bright for gaming. Voice control or automation via motion sensors adds convenience.
Always mention safety: if hardwiring, shut off the circuit at the panel and verify with a non-contact voltage tester. Wear safety glasses when drilling into walls, hidden fasteners or old wiring can be hazards.
Conclusion
A well-executed TV feature wall brings cohesion and intentionality to a living space. Whether it’s the warmth of wood, the texture of stone, or the clean lines of built-ins, the right approach depends on the room’s style, budget, and the builder’s skill level. Start with a clear plan, measure twice, and don’t skip surface prep or structural checks. The effort pays off in a room that feels designed, not decorated around a screen.