Blank walls drain the life out of a living room faster than anything else. But wall decor doesn’t require a credit card with a high limit, it just needs a bit of creativity and some basic materials. The difference between a $20 wall transformation and a $500 one often comes down to DIY effort, not quality. With the right approach, homeowners can create high-impact wall treatments using materials from hardware stores, thrift shops, and even their own closets.
Table of Contents
ToggleKey Takeaways
- Cheap decorating ideas for living room walls prioritize arrangement and DIY effort over expensive materials, with transformations possible for under $50 using gallery walls, paint, and thrift finds.
- Walls represent the largest visual surface in a room (300–400 square feet) and deliver more visual impact per dollar spent than furniture or accessories.
- DIY wall art projects like stretched fabric panels, oversized abstract paintings, and framed decorative paper cost under $25 and require no artistic skill.
- Peel-and-stick wallpaper and temporary solutions make wall decor renter-friendly and damage-free, allowing experimentation without permanent commitment.
- Thrift stores offer affordable treasures—vintage frames ($2–$8), large mirrors ($15–$25), and salvage pieces—that create high-impact wall displays when layered strategically.
- Proper wall anchors are essential for safety: use plastic anchors for light items (under 10 pounds), self-drilling anchors for medium weight (10–25 pounds), and toggle bolts for heavy items (25–50 pounds).
Why Focus on Wall Decor for Maximum Impact
Walls represent the largest visual surface in any room, typically 300-400 square feet in an average 12’x15′ living room. That’s a massive canvas sitting empty in most homes.
Focusing budget on walls delivers more bang per dollar than furniture or accessories. A $50 gallery wall arrangement can transform a space more dramatically than a $200 throw pillow set. Vertical surfaces catch the eye first when someone enters a room, making them the natural focal point.
Wall treatments also offer flexibility that furniture doesn’t. Renters can use damage-free hanging methods and peel-and-stick products. Homeowners can experiment with bold choices knowing that paint and patches cost under $30 to reverse. This low-risk, high-reward ratio makes walls the smartest place to start any room refresh.
DIY Wall Art Projects That Cost Almost Nothing
Large-scale art commands $200-$1,000 at retail, but DIY versions cost the price of a canvas and some paint, usually under $25.
Stretched fabric panels provide instant color and pattern. Buy 1-2 yards of clearance fabric ($5-$10), stretch it over pre-made canvas frames from craft stores ($8-$12 for 16″x20″), and staple the fabric to the back using a basic staple gun. No artistic skill required. Three panels in coordinating patterns create a cohesive statement wall.
Oversized abstract paintings work well for those willing to experiment. A 24″x36″ stretched canvas costs $15-$20. Apply acrylic paint ($3-$5 per tube) in broad strokes, scrapes, or splatters. The scale matters more than technique, large, confident marks read as intentional from across the room.
Framed scrapbook paper or wrapping paper offers another zero-skill option. Craft stores sell 12″x12″ decorative paper for $0.50-$2 per sheet. Pop these into thrift store frames or budget frames from discount retailers ($3-$8 each), and arrange them in a grid. The uniform size creates order even with varied patterns.
Many homeowners overlook tried-and-true beginner-friendly approaches that work regardless of experience level.
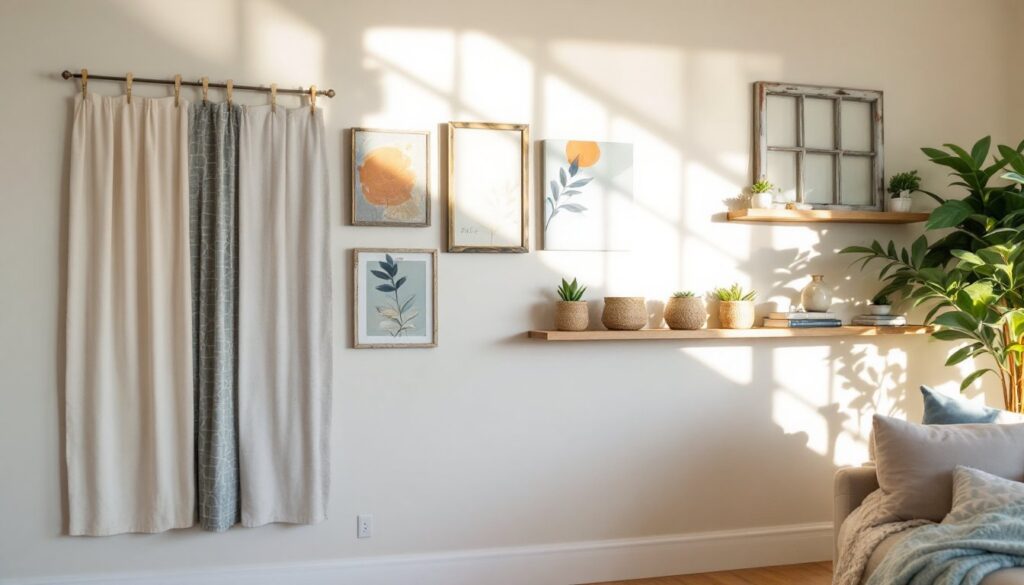
Creative Gallery Wall Ideas Using What You Already Have
Gallery walls cost nothing when using existing items strategically. The key lies in arrangement, not acquisition.
Empty the closets first. Framed family photos, old concert posters, children’s artwork, vintage maps, and even decorative plates all work. Mix frame styles and sizes, uniformity isn’t the goal. Lay everything on the floor first to test arrangements before hammering a single nail.
Spacing matters more than matching. Keep 2-3 inches between frames for a collected-over-time look. Measure and mark the center point of your wall space, then build outward from the largest piece. Use painter’s tape to mark frame positions on the wall before committing to nail holes.
Homemade art fills gaps cheaply. Press flowers or leaves between glass and backing ($0 if foraged). Frame pages from damaged vintage books found at library sales ($1-$3 per book). Scan and print old family photos at actual size, black-and-white copies on a home printer cost pennies.
3M Command Picture Hanging Strips ($8-$12 per pack) hold up to 16 pounds and work perfectly for renters or anyone avoiding wall damage. Follow weight limits precisely, overloading causes failures.
Affordable Alternatives to Expensive Wall Treatments
Custom wall treatments like board-and-batten, shiplap, or decorative molding typically run $500-$2,000 installed. Budget alternatives achieve similar visual weight for under $100.
Picture frame molding creates architectural interest with basic trim. Purchase 1×2″ pine boards (actual dimensions 3/4″x1-1/2″) at $2-$4 per 8-foot length. Miter the corners at 45° angles using a miter saw or miter box with hand saw ($15-$25 for manual versions). Attach molding to drywall using panel adhesive ($5-$8 per tube) and 18-gauge brad nails ($10 for 1,000). Paint the frames the same color as the wall for subtle dimension, or contrasting colors for drama.
Accent walls no longer require expensive materials. Stencils ($15-$30) and two paint colors create custom patterns. Pour satin or eggshell interior paint ($25-$35 per gallon) into a paint tray, load a dense foam roller ($3-$5) with minimal paint, and roll over the secured stencil. Repeat the pattern across the wall. One gallon covers approximately 350-400 square feet per coat.
Wood slat walls mimic expensive paneling. Buy 1×2″ furring strips ($2-$3 per 8-foot length), cut to ceiling height, and space them 4-6 inches apart. Secure to wall studs using 2″ construction screws driven into studs (locate with a stud finder, $10-$20). Use a level to keep slats plumb. Paint or stain before installation for easier coverage.
Professionals who master these foundational decorating techniques often transform spaces with minimal material costs.
Peel-and-Stick Solutions for Renters and Homeowners
Peel-and-stick wallpaper revolutionized renter-friendly decorating. Quality temporary wallpaper costs $30-$60 per 20.5″x18′ roll (covers about 30 square feet). Brands like RoomMates, Tempaper, and NuWallpaper offer hundreds of patterns.
Application requires patience, not skill. Clean the wall with a damp cloth and let dry completely. Measure and cut strips to height plus 2-3 inches for trimming. Peel back 6-12 inches of backing, align the top edge, and smooth downward while gradually peeling more backing. Use a plastic smoothing tool (often included) to eliminate bubbles. Trim excess at baseboards and ceiling with a utility knife against a metal straightedge.
Peel-and-stick tile works for accent walls behind shelving or media centers. 12″x12″ vinyl tile sheets cost $1-$3 each. Installation mirrors wallpaper, clean surface, peel, stick, smooth. Cut tiles with heavy scissors or a utility knife using a metal straightedge for precision.
Both options remove cleanly when pulled slowly at a 45° angle. Test a small corner first on textured walls, some textures resist good adhesion. Fresh paint needs 30 days to cure before applying any adhesive products.
Budget-Friendly Ways to Add Texture and Dimension
Flat walls feel one-dimensional. Adding physical depth costs less than most people assume.
Floating shelves create both function and visual interest. Purchase pre-made floating shelf brackets ($8-$15 per set) and 1×8″ or 1×10″ boards ($12-$20 per 6-foot length). Cut boards to desired length with a circular saw. Sand edges with 120-grit sandpaper, apply wood stain or paint, then mount to wall studs using the bracket hardware. Stagger shelf heights, not uniform horizontal lines.
Arrange objects in odd-numbered groups (3 or 5 items per shelf) mixing heights and textures. Include books, plants, small art, and sculptural objects. Empty space matters, resist filling every inch.
Macramé wall hangings bring texture without tools. Purchase macramé cord ($10-$18 per 100 yards) and learn basic knots from free online tutorials. A simple wall hanging requires a wooden dowel ($2-$4) and 2-3 hours. The boho texture softens hard wall surfaces.
Those exploring various room transformation projects often find that layered textures matter as much as color choices.
Plate walls use existing dinnerware as sculpture. Thrift stores sell decorative plates for $1-$4 each. Use adhesive plate hangers ($8 for a 6-pack) on plate backs, then hang on nails. Mix sizes and patterns within a color family for cohesion.
Basket collections mounted on walls add organic texture. Flat baskets with backing ($5-$12 at thrift stores) hang easily on nails. Arrange 3-7 baskets in varying sizes for impact. Natural woven textures complement most design styles from farmhouse to modern.
Thrift Store and Second-Hand Treasures for Wall Decor
Thrift stores stock unintentional wall decor goldmines. Visit weekly, inventory turns over constantly.
Large mirrors transform space and light for $10-$30. Ignore outdated frames, spray paint ($4-$6 per can) updates any finish. Apply primer first for better adhesion on glossy surfaces. A 36″x48″ mirror costs $200+ new but appears regularly at Goodwill for $15-$25.
Vintage frames offer character impossible to replicate new. Buy frames for $2-$8, remove the dated art, and insert new prints, fabric, or paint samples. Mismatched frames in similar finishes (all gold-tone, all dark wood) create intentional variety.
Old windows convert to frame-style wall art. Remove glass if broken, clean the frame thoroughly, and hang horizontally or vertically. Paint or leave distressed. Add small photos or art behind intact glass panes. Windows with divided lights (multiple panes) work especially well. Cost: $5-$20.
Budget-conscious decorators often reference tried-and-true thrift store tactics when sourcing materials for major room updates.
Architectural salvage pieces like corbels, molding fragments, or decorative iron work create sculptural wall installations. Mount directly to drywall using appropriate anchors, toggle bolts ($8-$12 for a 10-pack) hold heavier items. A single ornate corbel mounted at eye level becomes art.
Inspiration from budget makeover specialists proves that high-impact wall treatments rarely require premium materials.
Vintage textiles (quilts, tapestries, scarves) hang as wall art using quilt hangers ($10-$20) or a simple dowel with nails. Textiles soften acoustics while adding pattern. Protect valuable fabrics from direct sunlight to prevent fading.
Look for pieces with existing holes or damage sold at discount ($3-$10). The “damaged” sections may not show when hung strategically, or embrace the worn character as part of the piece’s history.
The smartest decorators apply foundational design principles even when working with secondhand materials and minimal budgets.
Safety note: Use appropriate wall anchors for weight. Standard drywall holds 20-30 pounds on a nail in a stud. Without studs, use plastic anchors for light items (under 10 pounds), self-drilling anchors for medium weight (10-25 pounds), or toggle bolts for heavy items (25-50 pounds). Always check anchor weight ratings on packaging.
Walls don’t need expensive treatments to look expensive, they need intention, proper execution, and materials that suit the scale of the space. A $100 budget spread across multiple projects creates more impact than a single $100 purchase. The homes that feel most complete often contain a mix of DIY projects, thrift finds, and strategic use of hardware store basics. Start with one wall, test ideas without commitment, and build from there.