A tiled shower bench does more than just look good, it adds function, safety, and resale value to your bathroom. Whether you’re mid-renovation or planning a full remodel, the tile you choose for that bench sets the tone for the entire shower. Get it right, and you’ve got a focal point that ties the room together. Get it wrong, and you’re stuck with a slippery eyesore that clashes with everything else. This guide breaks down the most popular tile options for shower benches, from timeless subway to bold mosaic patterns, and walks through what works, what doesn’t, and how to pull off a durable install that lasts.
Table of Contents
ToggleKey Takeaways
- A tiled shower bench adds function, safety, and resale value to your bathroom while serving as a focal point that ties the entire shower design together.
- Glazed ceramic subway tile remains the most affordable and versatile option for shower bench tile ideas, while natural stone like marble and granite offer luxury but require regular sealing and maintenance.
- Proper waterproofing is non-negotiable—apply a liquid or sheet membrane over the entire bench and slope the top 1/4″ per foot toward the drain to prevent water pooling and mold damage.
- Mosaic and patterned tiles like penny rounds, hexagons, and cement tiles can make your shower bench a bold design statement, though glass and cement tiles require extra care during installation.
- Choose epoxy-based or urethane-modified grout instead of standard cement grout to resist staining and mildew in wet shower environments, and coordinate bench tile with surrounding walls through matching, contrasting, or accent strategies.
Why a Tiled Shower Bench Is a Smart Addition to Your Bathroom
Built-in shower benches aren’t just a luxury feature, they’re practical. They give you a place to sit while shaving legs, resting during long showers, or helping kids or elderly family members bathe safely. A properly tiled bench integrates seamlessly with your shower’s waterproofing system, which beats any aftermarket plastic seat.
From a resale perspective, buyers notice built-in benches. They signal quality and attention to detail. A well-executed tiled bench suggests the rest of the bathroom was done right, too. It’s one of those features that doesn’t scream “upgrade” but quietly adds value.
Tile choice matters here more than you’d think. The bench is at eye level when you’re standing, so it’s visible. It’s also a high-contact surface, your skin, soap, and water hit it constantly. That means the tile needs to be slip-resistant, easy to clean, and durable enough to handle daily use without chipping or staining.
Most benches are framed with 2×4 or 2×6 lumber (actual dimensions 1.5″ x 3.5″ or 1.5″ x 5.5″), then covered with cement board or a foam bench kit, waterproofed, and tiled. If you’re DIYing, know that this is wet-area work, improper waterproofing leads to mold and structural damage. Follow manufacturer specs for your waterproof membrane, and don’t skip the sloped mortar bed on the bench top (1/4″ per foot slope toward the drain).
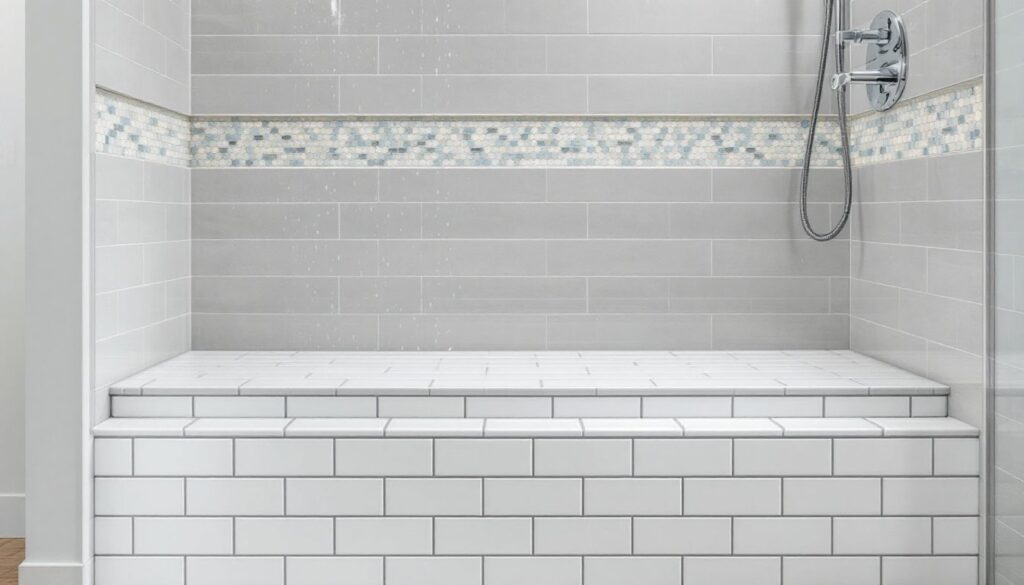
Classic Subway Tile Shower Bench Designs
Subway tile (3″ x 6″ is the standard nominal size) remains the go-to for homeowners who want a clean, timeless look. It’s affordable, widely available, and works in nearly any bathroom style, from farmhouse to mid-century modern. On a shower bench, subway tile can be installed horizontally, vertically, or in a herringbone pattern.
Horizontal installation is the most common and the easiest for DIYers. It visually stretches the bench and keeps grout lines simple. Vertical subway tile makes the bench feel taller and pairs well with vertical wall installations. Herringbone takes more time and planning, you’ll need to mark center lines carefully and use spacers religiously, but the result is worth it if you want a high-end look without spending on premium tile.
Go with glazed ceramic subway tile for the bench surface. Glazed finishes are easier to clean and more stain-resistant than matte or unglazed options. White is classic, but soft grays, pale blues, and even black subway tiles are trending. Just make sure your grout is epoxy-based or urethane-modified, standard cement grout stains and harbors mildew in wet environments.
One pro tip: use bullnose trim tiles on the front edge of the bench. It gives a finished look and protects the corner from chipping. If bullnose isn’t available in your tile line, you can use a Schluter Rondec or similar metal edge profile.
Natural Stone and Marble Shower Bench Ideas
Natural stone brings texture and luxury that ceramic can’t match. Marble, travertine, slate, and granite are the most common stone choices for shower benches. Each has pros and cons.
Marble is the high-end pick. White Carrara, Calacatta, and Statuario marble slabs or tiles create a spa-like feel. Marble does require sealing, plan to reseal every 6–12 months depending on use. It’s also softer than other stones, so it can scratch or etch from acidic cleaners. If you go marble, stick with pH-neutral cleaners and avoid anything with vinegar or citrus.
Travertine has a rustic, earthy look with natural pitting. It’s porous, so it also needs sealing. Some installers fill the holes with grout or epoxy before sealing to make the surface smoother. Travertine works well in Mediterranean or transitional bathrooms.
Slate is tougher and naturally slip-resistant, which makes it a smart choice for bench tops. It comes in grays, greens, and dark purples. The texture can be rough, though, which some people find uncomfortable to sit on. A honed or lightly polished finish softens that.
Granite is the most durable natural stone option. It’s dense, resists staining, and holds up to heavy use. It’s also heavier, so make sure your bench framing is solid, granite tile weighs about 20 pounds per square foot for 3/8″ thickness.
For stone benches, consider using a slab instead of tiles if your budget allows. A single-piece slab eliminates grout lines and looks cleaner. Fabricators can cut and polish the edges for a custom fit. Just verify that the slab is sealed properly before install, most fabricators apply a factory seal, but it’s worth confirming.
Modern Mosaic and Patterned Tile Benches
Mosaic tile turns a shower bench into a design statement. Penny rounds, hexagons, and small-format glass mosaics add color, texture, and visual interest. These tiles are typically mounted on mesh sheets (usually 12″ x 12″ sheets), which makes installation faster than placing individual tiles.
Penny round mosaics are popular for bench tops because the curved tile edges create natural slip resistance. They come in ceramic, porcelain, and glass finishes. Porcelain penny rounds are the most durable for high-traffic benches, they’re harder and more stain-resistant than ceramic.
Hexagon mosaics, both large-format (3″ or 4″ hexes) and small-format (1″ or 2″ hexes), are trending. Small hexes create a vintage or retro vibe and work especially well in black, white, or mixed-tone patterns. Large hexes feel more contemporary and pair well with minimalist bathroom designs.
Glass mosaic tiles are stunning but require extra care during installation. They show every imperfection in the substrate, so your mortar bed needs to be perfectly smooth. Use white thinset with glass tiles, gray thinset can show through and dull the color. Also, check that your thinset is rated for glass: some formulations can cause discoloration or bonding issues.
Patterned cement tiles (encaustic tiles) are another bold option. These hand-made tiles feature intricate geometric or floral patterns. They’re porous and must be sealed before grouting and again after. Cement tiles aren’t as durable as porcelain, so they’re better suited for benches that won’t see heavy daily use. But if you’re going for a statement piece and are willing to maintain it, they deliver serious visual impact. Many interior design ideas feature cement tile accents in high-end bath remodels.
Coordinating Your Shower Bench Tile with Surrounding Walls
Your bench tile doesn’t have to match your wall tile exactly, but it should coordinate. The most common approaches: match, contrast, or accent.
Matching means using the same tile on the bench as the walls or floor. This creates a cohesive, seamless look and is the safest design choice. It also simplifies ordering, you buy one tile type and don’t worry about mixing finishes. If your walls are large-format tile (12″ x 24″ or bigger), you might use a smaller version of the same tile or color for the bench to make installation easier on the curved or angled surfaces.
Contrasting means choosing a different tile that’s clearly distinct but complementary. For example, white subway walls with a black hex bench, or gray large-format walls with a white marble bench. Contrast draws the eye to the bench and makes it a focal point. Just keep the rest of the shower simple, too many competing patterns or colors make the space feel chaotic.
Accenting uses the bench as a place to introduce a pop of color or pattern. This works well if your walls are neutral. Think white walls with a teal glass mosaic bench, or gray walls with a patterned cement tile bench. The bench becomes the design moment. If you go this route, echo that accent color somewhere else in the bathroom, a towel, a rug, or a vanity detail, so it feels intentional.
Grout color plays a bigger role than most people realize. White or light gray grout keeps things bright and clean but shows dirt and soap scum faster. Medium to dark gray grout hides staining and is easier to maintain long-term. Contrasting grout (like black grout with white tile) emphasizes the grid and adds a graphic, modern look.
For a polished finish, make sure transitions between wall and bench tile are clean. Use a bullnose or Schluter profile where the bench meets the wall. Don’t try to miter ceramic tile, it rarely looks good unless you’re experienced with a wet saw and have steady hands.
Installation Tips for a Durable Tiled Shower Bench
Building a tiled shower bench isn’t a beginner’s first tile project, but an intermediate DIYer with solid measuring and leveling skills can handle it. Here’s what matters most.
Framing and support: Your bench frame needs to support both the weight of the tile assembly and a person sitting on it. Use 2×4 or 2×6 framing anchored to wall studs with 3″ deck screws or structural screws. Sistering the horizontal supports to studs is ideal. If you’re installing a floating bench (not supported by floor framing), make sure it’s secured to at least two studs and rated for 250–300 pounds.
Waterproofing: This is non-negotiable. Apply a liquid or sheet waterproof membrane over the entire bench surface and down the sides at least 6″. Products like RedGard, Aquadefense, or Kerdi membrane are code-compliant in most jurisdictions. Let it cure fully per manufacturer directions before tiling, usually 24 hours for liquid membranes. Miss this step, and you’ll have water infiltration and mold within a year.
Slope the bench top: The top surface should slope 1/4″ per foot toward the front edge or drain side. This prevents water from pooling. Create the slope with a mortar bed or pre-sloped foam bench top. If you’re DIYing the mortar bed, use a dry-pack mix (about 4 parts sand to 1 part Portland cement with minimal water). Trowel it smooth and let it cure before applying your waterproof membrane.
Tile layout: Dry-lay your tile on the bench before mixing thinset. Plan your cuts so they’re symmetrical and avoid tiny slivers at edges, those are hard to cut and look cheap. Mark your starting point and use tile spacers (1/8″ or 3/16″ is standard for most tile). For bench tops, use a medium-bed or large-tile thinset if you’re working with stone or large-format tiles. Back-butter each tile for full coverage.
Grout and seal: After thinset cures (usually 24 hours), apply grout. Use epoxy grout for benches, it’s waterproof, stain-proof, and far more durable than cement-based grout. It’s harder to work with and has a short working time, so mix small batches. After grouting, let it cure, then seal any natural stone or unglazed tile with a penetrating sealer. Reapply sealer annually.
Safety: Wear safety glasses when cutting tile, a dust mask when mixing mortar or cutting cement board, and knee pads if you’re working on the shower floor. A wet saw is the best tool for cutting tile, budget $100–$150 to rent one for a weekend or $200+ to buy a basic model.
Many professional bathroom remodels use these same techniques, and the results speak for themselves. If your bench will include electrical (like a steam generator or heated bench), pull permits and have a licensed electrician handle the wiring. Some jurisdictions require permits for any wet-area tile work that involves framing or plumbing changes, check local code.
Conclusion
A tiled shower bench is one of those features that earns its keep, functionally and visually. Whether you go classic subway, luxe marble, or bold mosaic, the key is choosing tile that fits your style, matches your skill level, and holds up to water and wear. Plan your layout, don’t skip waterproofing, and use the right materials for wet areas. Done right, your bench becomes the anchor of a great shower design. If you’re hunting for more design inspiration, spend time looking at finished installs, it’s the fastest way to see what works in real homes.