A cramped shower doesn’t have to feel like a compromise. With the right design moves, even a 32×32-inch footprint can deliver comfort, function, and style. Small shower remodels succeed when they prioritize smart material choices, thoughtful layout, and fixtures that earn their place. Whether working with an alcove, corner, or neo-angle shower, the goal is simple: make every square inch count. This guide breaks down practical updates that open up tight spaces, improve usability, and modernize outdated bathrooms without a full gut job.
Table of Contents
ToggleKey Takeaways
- Small shower remodel ideas succeed by prioritizing smart layout changes, such as neo-angle pans and curbless thresholds, that maximize usable space without expanding the footprint.
- Light, neutral tile colors and vertical patterns create visual height and openness, while large-format floor tiles reduce grout lines and simplify maintenance in compact bathrooms.
- Space-saving fixtures like ceiling-mounted rain heads, recessed niches, and single-handle thermostatic valves eliminate clutter and improve functionality in tight shower spaces.
- Frameless or semi-frameless glass enclosures enhance visual flow by allowing light to travel freely and making the entire bathroom feel more open and airy.
- Budget-friendly updates—such as epoxy coatings, regrouting, upgraded trim kits, and modern shower curtains—deliver maximum impact for under $500 without requiring major plumbing relocations.
- Built-in storage solutions like recessed niches and integrated benches serve double duty, providing organized storage while maintaining a clean aesthetic that prevents small showers from feeling cramped.
Smart Layout Changes to Make Your Small Shower Feel Bigger
Reconfiguring a small shower layout can add usable space without expanding the footprint. Start by evaluating the shower pan orientation. Swapping a standard square base for a neo-angle or corner unit frees up floor space and improves entry clearance. Neo-angle pans typically measure 36×36 inches or 38×38 inches and fit snugly into tight corners, making them ideal for powder rooms or secondary baths.
Consider moving the showerhead to the short wall if plumbing allows. This opens the longest sightline and reduces visual clutter. A centered drain, rather than one offset toward the entry, can also improve standing room and water flow. Note that relocating drains usually requires access to the subfloor and may trigger permit requirements depending on local codes.
Curbless or low-profile thresholds eliminate the barrier between the bathroom floor and the shower pan, creating a seamless transition that makes the room feel larger. This approach requires careful waterproofing and a sloped subfloor (typically 1/4 inch per foot) to direct water toward the drain. If structural modifications aren’t feasible, a low-profile acrylic or fiberglass threshold (2–3 inches high) offers a middle-ground solution.
Before relocating plumbing or altering the shower curb, check local building codes. Many jurisdictions follow the International Residential Code (IRC), which mandates specific clearances, waterproofing standards, and drainage slopes for shower installations.
Tile Patterns and Color Schemes That Open Up Compact Showers
Tile selection directly impacts perceived space. Light, neutral tones, white, pale gray, soft beige, reflect more light and make walls recede. Gloss or semi-gloss finishes amplify this effect, though they show water spots more readily than matte surfaces. For a balanced approach, use glossy tile on the upper two-thirds of the wall and matte on the lower third or floor.
Vertical tile patterns draw the eye upward, adding height to low ceilings. A classic subway tile installed in a stacked or vertical brick bond creates clean lines without overwhelming small surfaces. Stick with 3×6-inch or 4×12-inch tiles: anything larger can make a compact shower feel boxy.
Large-format tiles (12×24 inches or bigger) work well on floors and feature walls, reducing grout lines and creating visual continuity. Fewer grout joints also mean less maintenance and mildew risk. Pair large floor tiles with smaller wall tiles to avoid a monotonous look.
Avoid busy patterns or high-contrast borders in tight quarters. If color is desired, use it as an accent stripe at eye level or on a single feature wall. A slim band of mosaic tile in a muted blue or green adds interest without chopping up the space.
Consider terrazzo or matte white tile for a modern, warm aesthetic that works in small footprints. Terrazzo especially offers subtle pattern variation without visual clutter.
Space-Saving Fixtures and Hardware for Tight Spaces
Every fixture in a small shower must justify its footprint. Start with the showerhead. A ceiling-mounted rain head (8–10 inches in diameter) eliminates the need for a bulky shower arm and creates a spa-like feel. Alternatively, a low-profile wall-mount showerhead with a 6-inch arm keeps spray contained and won’t intrude into standing space.
For adjustable spray, choose a slide bar with a handheld wand. Mount it on the back wall or short side wall to keep the entry clear. Look for models with integrated soap dishes or hooks to reduce accessory clutter.
Single-handle thermostatic valves offer precise temperature control in a compact profile. They install flush to the wall and eliminate the need for separate hot and cold knobs. Thermostatic mixers also prevent scalding, a safety feature worth the modest upcharge.
Replace corner caddies and suction-cup shelves with recessed niches. A standard 12×12-inch niche fits between wall studs (16 inches on center) and provides ample storage without protruding into the shower. Install it at chest height for easy access to shampoo and soap. Prefabricated foam or plastic niche kits simplify installation and integrate with most waterproofing membranes.
Swap bulky towel bars for wall-mounted hooks or a slim fold-down bench. Teak or phenolic resin benches support up to 400 pounds and fold flat when not in use, making them ideal for shaving legs or resting a foot during washing.
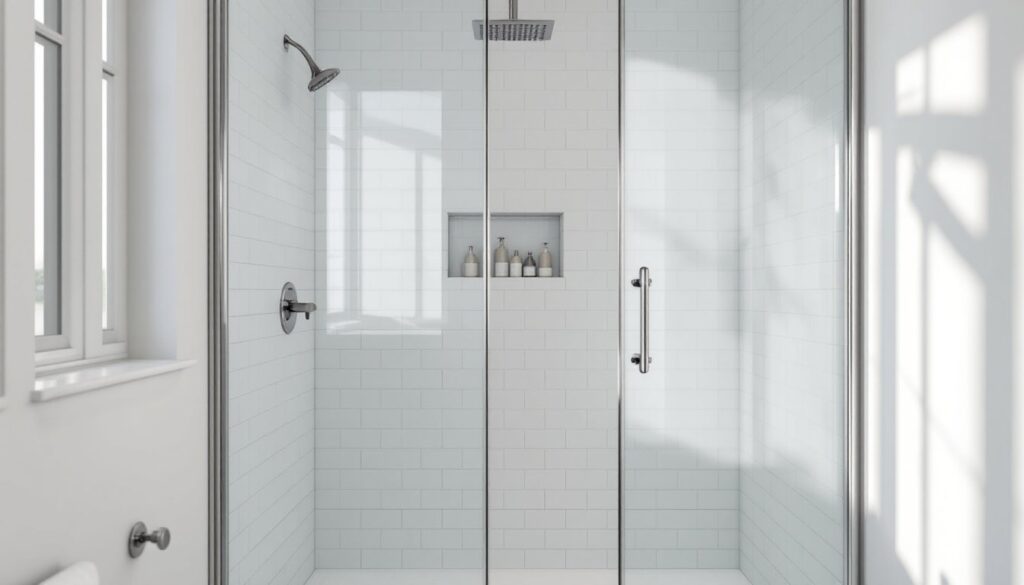
Glass Doors and Enclosures That Enhance Visual Flow
Frameless glass enclosures are the gold standard for small showers. They eliminate visual barriers, allowing light to travel freely and making the entire bathroom feel more open. Most frameless enclosures use 3/8-inch or 1/2-inch tempered glass, which meets safety standards and resists shattering.
If frameless isn’t in the budget, opt for a semi-frameless enclosure with minimal metal framing. Choose finishes that blend with existing hardware, brushed nickel, matte black, or chrome, to maintain a cohesive look.
For extremely tight spaces, a single hinged door or pivot door uses less clearance than a sliding door and doesn’t require tracks that collect soap scum. Hinged doors typically need 24–30 inches of clearance when open, so measure carefully before ordering.
Avoid frosted or heavily textured glass unless privacy is a concern. Clear glass maximizes light and sightlines. If privacy is needed, consider a narrow frosted band at eye level rather than obscuring the entire panel.
Inline panels (a single fixed glass panel without a door) work well in curbless or walk-in showers. They contain spray while preserving an open, airy feel. Pair them with a strategically placed showerhead to direct water away from the open side.
Always hire a professional for glass installation. Tempered glass is heavy (30–50 pounds per panel), and improper mounting can lead to leaks or, worse, shattered glass.
Built-In Storage Solutions for Small Shower Remodels
Storage is where most small showers fail. Recessed niches are the cleanest solution. Plan for at least one large niche (12×24 inches) or two smaller ones (6×12 inches each). Install them between studs during the framing stage, before tile goes up. Line niches with the same tile as the walls or use a contrasting color for a subtle accent.
If the studs are already closed in, surface-mount corner shelves made of stainless steel or tempered glass offer a fallback. Choose models with integrated drainage holes to prevent water pooling.
Integrated benches serve double duty as seating and storage. A tiled bench with a hollow base can hold extra bottles or cleaning supplies. Build it 17–18 inches high and 12–15 inches deep for comfortable seating. Use a waterproof foam bench form or build a mortar bed over a wooden frame, then tile to match the walls.
Shampoo ledges, narrow horizontal ledges that run the length of a wall, provide continuous storage without breaking up sightlines. They’re typically 4–6 inches deep and installed at chest height. Tile them to match or use a contrasting liner tile for definition.
For curbless showers, install a linear drain with a built-in storage channel. Some models include a shallow recess along the drain line for storing razors or soap without cluttering the shower floor.
Budget-Friendly Updates That Deliver Maximum Impact
Not every small shower remodel requires a sledgehammer. Resurfacing existing tile with an epoxy-based coating costs $200–$500 and gives dated tile a fresh look in a weekend. These coatings adhere to ceramic, porcelain, and even fiberglass, though they wear faster than new tile and typically last 3–5 years.
Regrouting and recaulking transforms a dingy shower for under $50. Remove old grout with a grout saw, then apply fresh sanded grout (for joints 1/8 inch or wider) or unsanded grout (for narrower joints). Seal grout with a penetrating sealer to resist mildew. Replace all silicone caulk around the base, corners, and fixtures, old caulk harbors mold and leaks.
Upgrade the showerhead and trim kit without moving plumbing. A new brushed nickel or matte black trim kit costs $80–$150 and modernizes the look instantly. Pair it with a low-flow showerhead (2.0 GPM or less) to save water and comply with efficiency standards in states like California.
Peel-and-stick tile decals or waterproof wall panels offer a no-demo alternative to full retiling. High-quality PVC or acrylic panels install directly over existing tile using construction adhesive, cutting labor and mess. They’re not as durable as ceramic tile but hold up well in secondary baths or rental properties. Homeowners seeking detailed cost guides and contractor resources can compare options before committing to a full renovation.
Swap a dated shower curtain for a curved tension rod and a modern fabric curtain. The outward curve adds a few inches of elbow room and makes the shower feel less confined. This update costs $30–$60 and takes ten minutes.
Conclusion
Small shower remodels succeed when design choices prioritize function and light. Frameless glass, recessed storage, and smart tile patterns make tight spaces livable without expensive expansions. Start with the layout, invest in quality waterproofing, and choose fixtures that fit the scale. Whether tackling a weekend refresh or a full gut, these strategies deliver results that last.