Setting up a dedicated gaming space for a teenager isn’t just about throwing a console on a desk. A well-designed gamer bedroom balances functionality, comfort, and aesthetics while keeping the room usable for sleep and assignments. Whether the teen is into PC gaming, console setups, or streaming, the room needs proper desk layout, cable management, lighting that reduces eye strain, and storage that keeps controllers and accessories from piling up on every surface. This guide walks through the practical decisions, from ergonomic seating to soundproofing basics, that turn a standard bedroom into a gaming-friendly zone without requiring a full renovation.
Table of Contents
ToggleKey Takeaways
- A well-designed teenage gamer bedroom requires a 48–60 inch wide desk with proper monitor placement at arm’s length, built-in cable management, and dedicated power strip with surge protection to support extended gaming sessions safely.
- Bias lighting with 6500K LED strips and dimmable ceiling fixtures reduce eye strain and screen glare, while avoiding harsh overhead lights and limiting RGB accents to one or two zones keeps the space functional without distraction.
- Ergonomic seating with adjustable lumbar support, 4D armrests, and proper height adjustment (16–21 inches) is more important than gaming-branded aesthetics when choosing a chair for marathon sessions.
- Vertical storage solutions like pegboards, floating shelves anchored to studs, and cable management boxes keep controllers, headsets, and accessories organized without cluttering the desk surface.
- Acoustic treatment using foam panels, weatherstripping, door sweeps, and soft-close casters minimizes sound disturbance to other household members while maintaining a functional gaming space.
- Most teenage gamer bedroom improvements don’t require structural changes, making them accessible for renters and homeowners to implement incrementally, starting with desk and seating before adding lighting and decor.
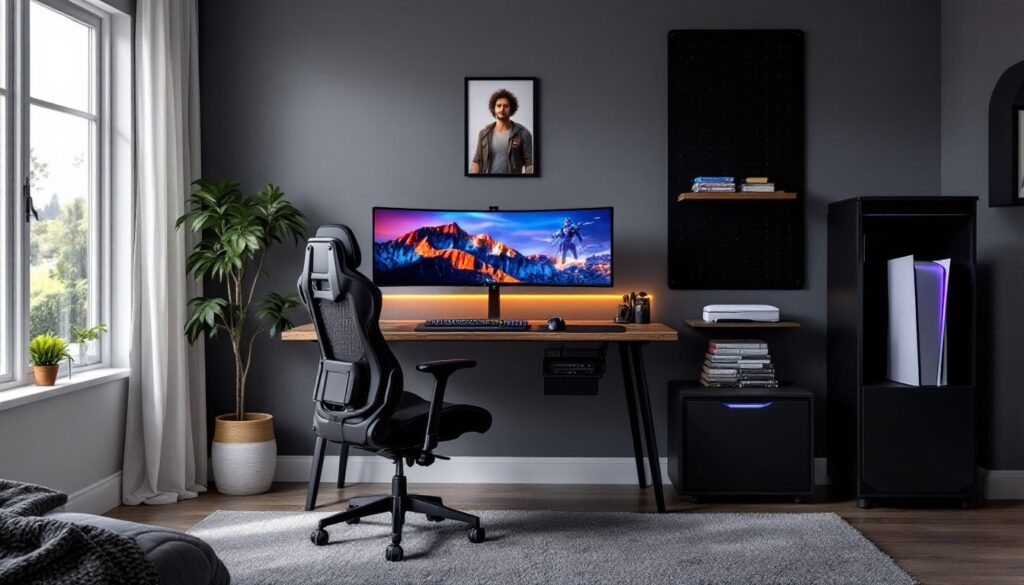
Essential Gaming Setup and Desk Layout
Start with desk dimensions that fit the monitor setup and peripherals. For a dual-monitor or single ultrawide display, aim for a desk at least 48–60 inches wide and 24–30 inches deep. Adjustable-height desks (electric or crank) let the user switch between sitting and standing, which matters during long sessions.
Desk surface material affects durability and cable routing. Solid wood or engineered wood with a laminate finish resists scratches and moisture better than particleboard. Look for desks with built-in cable grommets or plan to add aftermarket clips to keep power cables, HDMI, and USB runs tidy along the back edge.
Monitor placement follows the arm’s-length rule: the screen should sit roughly 20–30 inches from the user’s eyes, with the top of the display at or slightly below eye level. Use a dual-arm monitor mount if space is tight: it frees up desk real estate and simplifies adjustments. For consoles, ensure the TV or monitor has low input lag (under 20 ms) and supports the refresh rate the console outputs, 120 Hz for newer PlayStation and Xbox models.
Power and outlet access is non-negotiable. Install a surge-protecting power strip with at least six outlets and USB charging ports. Mount it under the desk with adhesive clips or screws to prevent tripping over cords. If the bedroom’s existing outlets are limited, consider adding a new dedicated 15-amp circuit, consult a licensed electrician and check local codes (NEC Article 210 covers branch-circuit requirements).
Ventilation around equipment prevents overheating. Leave at least two inches of clearance behind consoles and PCs. If the setup includes a full tower PC, position it on the floor with a raised platform or tray to avoid carpet blocking intake fans.
Smart Lighting Solutions for Gaming Ambiance
Bias lighting reduces eye strain by matching ambient light to screen brightness. Mount an LED strip along the back edge of the monitor or TV, look for kits rated at 6500K color temperature for neutral white, or RGB strips if the teen wants color customization. Adhesive-backed strips work on most surfaces: clean the mounting area with isopropyl alcohol before application.
Ceiling and task lighting should be dimmable. Swap the existing overhead fixture for a smart bulb (Wi-Fi or Zigbee) that supports scheduling and brightness control via phone app. Avoid harsh downlights directly above the desk: they create glare on screens. Instead, position a swing-arm desk lamp with a diffused LED bulb (800–1000 lumens) for assignments or when reading build guides.
RGB accent lighting is popular but can be distracting. Limit it to one or two zones, behind the desk or along shelving, and use channels or diffusers to soften the output. Wireless controllers (infrared or Bluetooth) let users sync colors with gameplay, though this is purely aesthetic.
Mounting hardware matters for safety. Use cable staples or J-channels to secure low-voltage wiring along baseboards or crown molding. Never run LED strip transformers through walls without a proper junction box: this violates electrical code in most jurisdictions. If the teen wants permanent in-wall lighting control, hire a licensed electrician to install a dimmer switch rated for LED loads (standard dimmers can cause flickering).
Storage and Organization for Gaming Gear
Controllers, headsets, charging cables, and game cases pile up fast. Dedicated storage keeps them accessible without cluttering the desk. A pegboard wall panel (24 x 48 inches minimum) mounted above the desk holds headsets on hooks, controllers on brackets, and cables on wire loops. Paint or stain the pegboard to match the room’s palette.
Drawer organizers work well for smaller accessories. Use velvet-lined trays or modular plastic bins (available at home improvement stores) inside desk drawers to separate charging cables, spare batteries, microSD cards, and earbuds. Label each compartment if multiple users share the space.
Vertical shelving maximizes floor space. Install floating shelves (12–16 inches deep) along one wall for console storage, collectibles, or game cases. Anchor shelves into wall studs using #10 wood screws (minimum 2.5 inches long) or toggle bolts for drywall-only mounting. Each bracket should support at least 50 pounds if holding consoles or a PC tower.
For physical game collections, a media tower or cube storage unit keeps cases organized by system. Measure the game case dimensions first, standard Switch, PlayStation, and Xbox cases vary slightly in width. Many gamers are adopting digital library solutions to reduce physical clutter, but physical collectors still need dedicated shelf space.
Cable management boxes hide power strips and excess cord slack. Use a plastic or wood box with ventilation slots, and secure it under the desk or behind a nightstand. Route cables through the back opening and close the lid, this prevents tripping and keeps pets or vacuums from snagging wires.
Comfortable Seating Options for Marathon Gaming Sessions
Ergonomics matter more than aesthetics. A gaming chair should support the lower back, adjust for height, and allow feet to rest flat on the floor. Look for chairs with adjustable lumbar support, 4D armrests (height, width, depth, angle), and a recline range of 90–135 degrees. Mesh-back chairs improve airflow: leather or faux-leather options are easier to wipe down but trap heat.
Seat height range should accommodate the desk. Measure from the floor to the underside of the desk and subtract 10–12 inches, that’s the ideal seat pan height. Most office chairs adjust between 16 and 21 inches, which fits users from 5’0″ to 6’2″. If the teen is outside that range, test the chair in person or check the manufacturer’s spec sheet.
Chair base and casters affect mobility and floor protection. A five-point base (five legs radiating from the center) distributes weight evenly and prevents tipping. For hardwood or laminate floors, use hard casters (nylon or polyurethane): for carpet, soft rubber casters reduce rolling resistance. Swap them out with a screwdriver, most pull straight out of the base.
Bean bags and floor cushions work for console gaming on a TV across the room, but they don’t provide back support for extended sessions. If the teen prefers casual seating, choose a floor gaming chair with a folding backrest and built-in lumbar pillow. These fold flat for storage and often include side pockets for controllers.
Testing before buying is critical. If purchasing online, verify the return policy. Chairs marketed as “gaming” often cost more than equivalent office chairs with the same adjustments, compare specs, not branding.
Wall Decor and Personalization Ideas
Wall decor should reflect the teen’s gaming interests without overwhelming the room. Framed poster prints are the simplest option, use lightweight frames with plexiglass instead of glass for safety. Hang frames using picture-hanging strips (rated for the frame weight) or picture hooks nailed into studs.
Vinyl wall decals apply and remove without damaging paint, making them ideal for renters or teens who switch interests frequently. Clean the wall surface with a damp cloth before application to ensure adhesion. Avoid textured or freshly painted walls (wait at least two weeks after painting).
LED neon signs (acrylic or silicone, not glass) add a custom element. Battery-powered or plug-in options are both available: plug-in versions need an outlet within six feet unless an extension cord is used. Mount signs using adhesive strips or small nails through pre-drilled holes in the backing plate.
Corkboard or magnetic boards let the teen rotate artwork, schedules, or achievement screenshots. A framed corkboard (24 x 36 inches) mounts like a picture frame and doubles as a mood board. Magnetic paint is another option, apply two coats to a 3 x 4-foot wall section, then finish with latex topcoat in the desired color. This creates a surface for magnetic clips and prints without visible hardware.
Many DIY room makeover tutorials emphasize paint as the fastest transformation. An accent wall behind the gaming setup, painted in a darker or contrasting shade, creates visual depth without requiring new furniture. Use painter’s tape along trim and edges, and apply two coats of latex or acrylic paint with a roller (3/8-inch nap for smooth walls).
Sound Management and Acoustic Considerations
Gaming audio can disturb other household members, especially late at night. Closed-back headphones (over-ear or on-ear) isolate sound better than open-back models and prevent audio bleed. Look for headsets with detachable cables, they’re easier to replace if the cord fails.
For speakers, position them at ear level when seated, angled slightly inward toward the listening position. Bookshelf speakers on desktop stands or wall-mounted brackets reduce desk clutter. If bass is a concern, add a subwoofer with adjustable volume control and place it on the floor away from shared walls to minimize vibration transfer.
Acoustic treatment reduces echo and prevents sound from bouncing into adjacent rooms. Foam acoustic panels (2-inch thickness minimum) absorb mid and high frequencies. Mount panels at reflection points, the wall sections directly to the left and right of the listening position, and the wall behind the desk. Use adhesive strips or small finishing nails: avoid heavy construction adhesive if the teen might rearrange later.
Door sweeps and weatherstripping seal gaps under and around the bedroom door, blocking sound leakage. A door sweep (aluminum or vinyl) attaches to the bottom of the door with screws and compresses against the threshold when closed. Adhesive weatherstripping (foam or rubber) lines the door jamb and reduces rattling.
Carpeting and rugs dampen footfall noise and absorb sound reflections. If the room has hard flooring (wood, laminate, or tile), add a rug pad underneath an area rug to prevent slipping and improve sound absorption. For serious soundproofing, like streaming or late-night sessions, consider consulting a professional. Structural changes (adding mass-loaded vinyl or resilient channels) often require removing drywall and may need permits.
Conclusion
Building a functional gaming bedroom comes down to planning desk layout, managing cables, choosing seating that supports long sessions, and controlling sound. Prioritize ergonomics and ventilation over aesthetics, gear runs cooler and bodies stay comfortable when the setup respects physics. Most of these upgrades don’t require structural changes, so renters and homeowners alike can execute them. Start with the desk and seating, then layer in lighting, storage, and decor as budget allows.