Most homeowners underestimate how dramatically flooring changes a room’s character. It’s the largest uninterrupted surface in any space, yet it’s often treated as an afterthought, install whatever’s on sale, move in the furniture, call it done. But flooring sets the tone for everything else: color palette, furniture style, even how sound travels through a room. Swapping out builder-grade carpet or scuffed laminate for something unexpected can turn a forgettable space into the most memorable room in the house, and many of these options are within reach for competent DIYers willing to prep carefully and work methodically.
Table of Contents
ToggleKey Takeaways
- Unique flooring ideas transform rooms dramatically by becoming the largest visual surface, setting the tone for color, style, and even sound quality in a space.
- Many striking unique flooring options like painted subfloor and peel-and-stick vinyl are budget-friendly, with the investment being primarily time and technique rather than materials cost.
- Mixed-width wood planking, directional pattern changes, and reclaimed materials create distinctive character without the premium price of solid hardwood alternatives.
- Creative tile layouts such as herringbone, hexagon, and encaustic cement tiles add visual interest while using the same materials in non-standard installation patterns.
- Cork and bamboo flooring offer natural durability and comfort but require proper acclimation and moisture protection to prevent warping, gaps, and buckling.
- Mixed-material floors combining wood, tile, concrete, and resin create custom art-like spaces but demand careful transition management and ongoing maintenance across multiple finishes.
Why Unique Flooring Makes a Difference in Your Home
Standard oak hardwood and beige carpet have their place, but they don’t communicate anything about the people living there. Unique flooring, whether it’s reclaimed wood with visible nail holes, geometric tile in a bold pattern, or painted plywood subfloor, adds texture, color, and story.
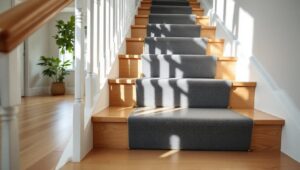
From a practical standpoint, distinctive flooring can also disguise wear better than monochrome surfaces. A herringbone pattern hides dirt better than straight planks. Cork’s natural mottling camouflages scuffs. And when it comes to resale, memorable flooring tends to photograph well, which matters in a market where most buyers scroll listings on their phones before ever visiting in person.
There’s also the cost angle. Many of the most striking floors aren’t expensive materials, they’re standard materials installed creatively. Painted subfloor runs about $1–2 per square foot in materials. Peel-and-stick vinyl tile in an unexpected layout costs far less than custom stone. The investment is often time and technique, not dollars. That makes unique flooring one of the best value-per-impact projects in a home.
Creative Wood Flooring Alternatives
Solid hardwood remains the gold standard, but there’s a growing interest in wood flooring that tells a different story, literally. End-grain wood blocks, parquet salvaged from old gyms, wide-plank pine with saw marks still visible, all of these bring texture and history that fresh-milled oak can’t match.
Another angle: mixed-width planking. Instead of uniform 3¼-inch strips, combine 2-inch, 4-inch, and 6-inch boards in a random pattern. It mimics the look of reclaimed floors without the per-square-foot cost. Most mills will sell mixed-width bundles, and installation follows the same process as standard strip flooring, just requires more planning during layout.
For a modern twist, consider directional changes within a single room. Run planks horizontally in the main area, then switch to a diagonal or herringbone pattern in a defined zone (under a dining table, in an entryway). This works especially well in open-plan spaces where you want to define areas without adding walls or rugs. Fair warning: transitions like this require a miter saw, a keen eye for layout, and extra material for waste, figure 15–20% overage instead of the standard 10%.
Reclaimed and Pallet Wood Floors
Reclaimed wood offers character that’s impossible to fake: nail holes, saw marks, color variations from decades of UV exposure. Salvaged barn siding, old fence boards, and deconstructed pallets are all fair game, though they require significant prep work.
Before installation, each board needs inspection for embedded nails, staples, or rot. A metal detector helps. Then comes planing or sanding to achieve uniform thickness, most reclaimed wood varies by ⅛ to ¼ inch. You’ll need access to a thickness planer unless you’re buying pre-milled reclaimed stock, which costs significantly more.
Pallet wood is the budget version of this concept, and it’s genuinely free if you know where to look. Check behind retail stores, garden centers, or industrial parks. Look for HT-stamped pallets (heat-treated), not MB (methyl bromide, a pesticide you don’t want indoors). Disassemble with a reciprocating saw or pry bar, pull all nails, then plane to consistent thickness.
Installation can go directly over plywood subfloor using 18-gauge brad nails and construction adhesive. Tongue-and-groove isn’t necessary for rustic applications, butt joints and slight gaps actually add to the aesthetic. Finish with multiple coats of water-based polyurethane (oil-based will yellow the wood and amplify any existing stains). The whole process is labor-intensive but materials cost is nearly zero, making it ideal for workshops, mudrooms, or basement spaces where perfection isn’t the goal.
Unexpected Tile Patterns and Materials
Tile doesn’t have to mean 12×12 white ceramic in a grid. The real transformation happens when standard materials get installed in non-standard ways. Herringbone, chevron, basket weave, hexagon, and Moroccan fish scale are all worth considering, and most add zero material cost, you’re just cutting and placing differently.
Many design sourcebooks showcase striking tile layouts using affordable materials in creative patterns.
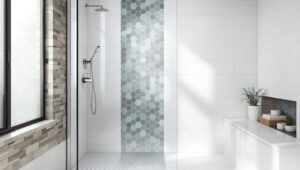
Hexagon and penny tiles (small rounds or hex shapes on a mesh backing) work beautifully for floors that need visual interest without loud color. They’re slower to install than large-format tile because grout lines multiply, but the effect is worth it in entryways, bathrooms, or laundry rooms. Use unsanded grout for joints narrower than ⅛ inch.
For a bolder move, consider encaustic cement tiles, patterned, pigmented tiles that don’t rely on glazing. They’re porous and require sealing (use a penetrating sealer, reapply annually), but the graphic punch is unmatched. Expect $8–15 per square foot for quality cement tile, which is pricey but competitive with natural stone.
Another underused option: large-format porcelain slabs in wood or stone looks, installed with tight grout lines (1/16 inch). These 12×24 or 24×48 planks mimic hardwood but handle moisture, making them ideal for basements, bathrooms, or kitchens. Installation requires a wet saw and a level subfloor (within ⅛ inch over 10 feet). If the subfloor is out of plane, use self-leveling compound first, skipping this step leads to lippage (edges that don’t align) and cracked tiles.
Bold Cork and Bamboo Flooring Options
Cork flooring has been around for decades, but recent manufacturing improvements have made it more durable and visually interesting. It’s warm underfoot, naturally antimicrobial, and quieter than hardwood. Cork compresses slightly under heavy furniture, so use furniture coasters on table and chair legs, this isn’t optional.
Installation typically uses floating click-lock planks over underlayment, similar to laminate. Cork is more forgiving of subfloor imperfections than tile, but it still needs a vapor barrier if installed over concrete. Finish options include pre-finished polyurethane (most common) or unfinished cork that you seal yourself with water-based poly. Unfinished cork allows custom staining, which opens up color options beyond the standard tan-brown range.
Bamboo is harder than most domestic hardwoods (strand-woven bamboo rates around 3,000 on the Janka hardness scale: red oak is 1,290). It’s technically a grass, so it grows faster and is often marketed as eco-friendly, though the manufacturing process and overseas shipping complicate that claim.
Bamboo installs like hardwood: nail-down, glue-down, or floating. The biggest pitfall is moisture sensitivity, bamboo must acclimate in the room where it’ll be installed for at least 72 hours, ideally a week. Skip acclimation and you’ll get gaps or buckling within months. Measure moisture content with a pin-type meter before installation: it should match the room’s relative humidity.
Both cork and bamboo are not recommended for below-grade basements unless the space is climate-controlled and a moisture barrier is installed. In above-grade rooms, they’re excellent for bedrooms, living rooms, and home offices. Don’t use them in full bathrooms or laundry rooms where standing water is a risk.
Statement Flooring with Paint and Stencils
Painted floors might sound like a temporary fix, but done right, they’re durable, striking, and incredibly affordable. This works on plywood subfloor, hardwood, or concrete, not over vinyl or laminate.
Start with a clean, sanded surface. For plywood subfloor, fill seams and screw holes with wood filler, sand smooth, then prime with oil-based stain-blocking primer (BIN or Zinsser Cover Stain). This prevents knots and tannins from bleeding through. For concrete, use a bonding primer.
Base coat with porch and floor enamel in your chosen color. Two coats minimum, applied with a ⅜-inch nap roller. Let each coat cure fully (24 hours). Once the base is dry, apply your pattern, stripes, checkerboard, stenciled designs, or even freehand geometric shapes.
For crisp lines, use FrogTape (the green kind with PaintBlock technology) and a small foam roller or artist’s brush for pattern work. Remove tape while the paint is still slightly tacky to prevent peeling.
Seal everything with three coats of water-based polyurethane in satin or semi-gloss. Oil-based poly is tougher but yellows over time, which can muddy your colors. Reapply poly annually in high-traffic areas. Painted floors hold up surprisingly well, expect 3–5 years before needing a refresh, longer in low-traffic rooms.
Safety note: Ensure excellent ventilation during priming and painting. Wear a respirator with organic vapor cartridges, not just a dust mask, especially when using oil-based products.
Mixed Materials for One-of-a-Kind Floors
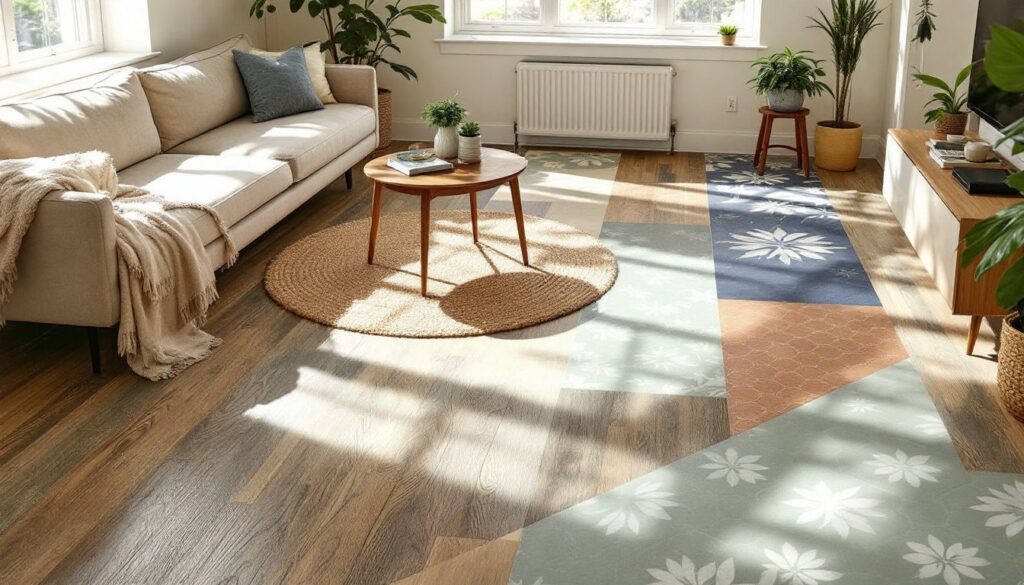
Combining materials, wood and tile, concrete and metal inlays, stone and resin, creates visual boundaries and adds complexity that single-material floors can’t achieve. This is advanced work, but it’s where floors become art.
A common approach: tile entryway transitioning to hardwood in the main living space. The key is managing the height difference. Tile plus thinset plus underlayment often sits ⅜ to ½ inch higher than hardwood. Use a hardwood transition strip (T-molding or reducer) to bridge the gap, or plane down the subfloor under the tile area before installation so both materials end up flush. The latter requires a belt sander or planer and careful measurement.
Another striking combination: concrete with wood inlays. Pour a concrete overlay (self-leveling or troweled), then rout grooves in a pattern and insert wood strips (think long, thin pieces of walnut or oak). The wood sits slightly proud of the concrete, creating subtle texture. Seal both materials together with a high-build epoxy or polyurethane.
For those chasing renovation inspiration, mixed-material floors offer a custom look that’s difficult to replicate.
Resin and aggregate floors (like terrazzo or DIY epoxy pours with embedded stones, glass, or metal flakes) require meticulous surface prep and mixing ratios. Epoxy is unforgiving, once it starts to cure, you can’t fix mistakes. If you’ve never worked with two-part epoxy, practice on a small section first or hire a pro. This is one area where DIY can go sideways fast if you don’t follow manufacturer instructions exactly.
When mixing materials, always consider expansion rates. Wood expands and contracts with humidity: tile and concrete don’t. Leave expansion gaps around the perimeter of wood floors (covered by baseboard) and avoid rigid connections between dissimilar materials unless using a flexible transition piece.
Finally, remember that complex floors require more maintenance. Multiple materials mean multiple cleaning products and different care schedules. Stone might need periodic sealing, wood needs poly refresh, tile grout benefits from annual resealing. Budget time accordingly, or the floor that looked amazing in year one will look tired by year three.