Choosing flooring for a small kitchen isn’t just about picking a pretty pattern. Every material decision affects how spacious the room feels, how much maintenance someone will deal with, and whether the floor can handle dropped pots and foot traffic. Small kitchens demand smarter choices because there’s less square footage to forgive mistakes. The wrong floor can make a tight galley feel like a hallway, while the right one opens up sightlines and creates the illusion of more space. This guide walks through practical flooring options that balance durability, cost, and visual impact for compact kitchens.
Table of Contents
ToggleKey Takeaways
- Light-colored flooring in porcelain, ceramic, or luxury vinyl plank expands visual space in small kitchens by reflecting light and opening sightlines.
- Large-format tiles with rectified edges and minimal grout lines create a seamless look that makes compact kitchens feel larger and more streamlined.
- Luxury vinyl plank offers a budget-friendly, waterproof alternative for small kitchen flooring that resists spills, requires minimal maintenance, and supports DIY installation.
- Diagonal and herringbone patterns draw the eye across the longest sightline, visually widening narrow galley kitchens while adding dynamic visual interest.
- Porcelain tile and SPC vinyl cores provide superior durability against spills, dropped utensils, and concentrated foot traffic common in tight kitchen layouts.
- Proper subfloor preparation—including leveling and acclimation time—prevents premature damage and ensures small kitchen flooring investments last for years.
Why Flooring Choices Matter More in Small Kitchens
In a 10×10 or 8×12 kitchen, flooring becomes a dominant visual element. Unlike larger spaces where cabinetry and islands command attention, small kitchens expose more floor area relative to wall and counter space. That makes the floor one of the first things someone notices when walking in.
Flooring also impacts spatial perception. Dark, busy patterns can shrink a room visually, while light, continuous surfaces stretch sightlines. The grout lines, plank orientation, and material reflectiveness all play a role in how open or cramped the kitchen feels.
From a practical standpoint, small kitchens often see concentrated traffic. The cooking triangle, sink, stove, and refrigerator, tends to be tighter, meaning more wear in fewer square feet. Flooring needs to handle spills, dropped utensils, and constant foot traffic without showing damage quickly. Choosing a material that’s both durable and easy to clean saves headaches down the line. Skimping on quality or selecting the wrong finish can lead to stains, scratches, or premature replacement.
Light-Colored Floors to Open Up Your Space
Light-toned flooring is one of the most effective ways to make a small kitchen feel larger. White, pale gray, beige, and blonde wood tones reflect more light than darker options, which brightens the room and creates an airier feel. This effect is especially noticeable in kitchens with limited natural light or small windows.
Porcelain or ceramic tile in whites and light grays works well here. Look for tiles with a matte or satin finish rather than high-gloss, too much shine can look institutional. Porcelain is denser and more water-resistant than ceramic, making it a better choice for kitchens prone to spills.
Luxury vinyl plank (LVP) in pale oak or ash tones mimics hardwood without the moisture sensitivity. These planks typically come in 6- to 9-inch widths and lengths up to 48 inches, with a wear layer rated at 12 to 20 mils for residential use. The thicker the wear layer, the better it holds up to scratches.
Light-colored natural stone, like travertine or limestone, adds warmth but requires sealing every 1-2 years to prevent staining. Stone also costs more upfront, expect $8-$15 per square foot for material alone, compared to $2-$5 per square foot for quality LVP.
One caution: extremely light floors show dirt and crumbs more easily. In high-traffic kitchens, a soft gray or greige (gray-beige) hides everyday grime better than pure white. Designers often recommend comparing samples under different lighting conditions before committing, since showroom lighting can distort how a color reads in a home setting.
Large-Format Tiles for a Seamless Look
Grout lines break up a floor visually. The more grout joints, the busier the surface looks, and the smaller the room feels. Large-format tiles, typically 12×24 inches, 18×18 inches, or larger, minimize grout lines and create a more continuous surface, which tricks the eye into perceiving more space.
Rectified tiles (tiles with precisely cut edges) allow for tighter grout joints, sometimes as narrow as 1/16 inch. This nearly seamless look works particularly well with light-colored porcelain or concrete-look tiles. For reference, traditional ceramic tiles usually require 1/8- to 1/4-inch grout joints.
Installation requires a flat subfloor. Large tiles highlight any dips or humps in the underlayment, so the subfloor needs to be within 1/8 inch over 10 feet per most tile manufacturer specs. If the existing floor is out of level, a self-leveling compound may be necessary before laying tile. Skipping this step leads to lippage, where tile edges don’t sit flush, which looks sloppy and creates a tripping hazard.
Large-format tiles also weigh more, which can be a concern on upper floors or over older joists. A 24×24-inch porcelain tile can weigh 4-5 pounds per square foot before adding thinset mortar. If the kitchen is on a second floor, confirm that the joist spacing and subfloor thickness can support the load. Most residential floors are built to handle 40 pounds per square foot live load, but it’s worth checking if there’s any doubt.
From a design standpoint, large tiles suit modern and minimalist kitchens. They read as cleaner and more streamlined than smaller mosaics or traditional 12×12 tiles. Pairing them with unsanded grout (for joints under 1/8 inch) keeps the look crisp.
Vinyl Plank Flooring: Budget-Friendly and Versatile
Luxury vinyl plank (LVP) and luxury vinyl tile (LVT) have become go-to options for small kitchens because they combine affordability, water resistance, and realistic wood or stone looks. Quality LVP can fool most people, it’s come a long way from the peel-and-stick vinyl of decades past.
LVP is sold in planks that mimic hardwood, typically 6 to 9 inches wide and 36 to 48 inches long. LVT usually replicates tile or stone in square formats. Both are constructed with a wear layer (measured in mils), a printed design layer, a core layer (either WPC, wood-plastic composite, or SPC, stone-plastic composite), and a backing. SPC cores are denser and more dimensionally stable, making them better for high-traffic kitchens.
Most manufacturers offer planks with click-lock installation, which floats over the subfloor without adhesive. This makes it a realistic DIY project for someone comfortable using a utility knife, straight edge, and tapping block. Installation typically takes a weekend for a small kitchen, assuming the subfloor is clean and level. Acclimate the planks in the room for 48 hours before installation to prevent expansion or contraction after install.
Water resistance is a major advantage. Unlike laminate (which swells if water seeps into the core), LVP and LVT are waterproof. Spills, splashes, and even minor flooding won’t ruin the floor, as long as water doesn’t sit for days. That said, grout lines between LVT tiles can let moisture through to the subfloor if not sealed properly, so LVP planks with tight seams are often safer in kitchens.
Cost-wise, expect $2-$6 per square foot for mid- to high-quality LVP, plus underlayment if not attached. Professional installation adds another $1-$3 per square foot, but this is a project many homeowners can handle themselves with basic tools.
One downside: vinyl isn’t as eco-friendly as natural materials. It’s petroleum-based and not biodegradable. Some brands now offer recycled content or phthalate-free formulations, which are worth considering for anyone concerned about VOC emissions or environmental impact.
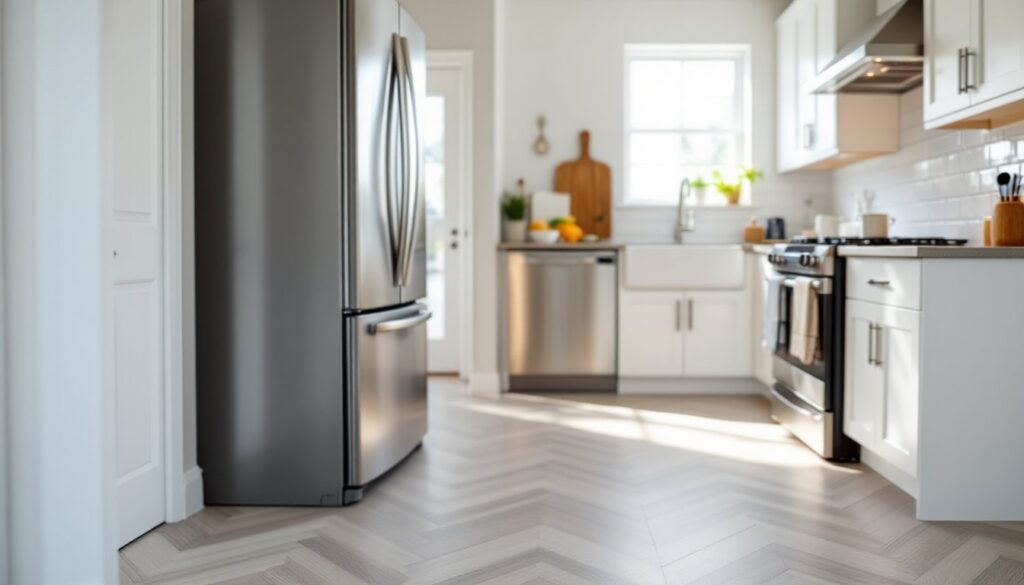
Diagonal and Herringbone Patterns to Add Visual Depth
The direction and pattern of flooring can alter how a room’s dimensions are perceived. Running planks or tiles diagonally (at a 45-degree angle to the walls) draws the eye across the longest sightline, making a narrow galley kitchen feel wider. This works with wood, LVP, or rectangular tile.
Diagonal layouts do create more waste, typically 10-15% more material than straight runs, because of the angled cuts at walls and corners. A miter saw or wet tile saw (depending on material) makes cleaner cuts than a circular saw or snap cutter. For tile, a tile scribe helps mark precise angles.
Herringbone and chevron patterns take this concept further. Both involve laying planks or tiles at angles to each other, creating a zigzag effect. Herringbone has planks meeting at 90-degree angles in a staggered pattern: chevron has planks cut at angles to meet in a point. These patterns add visual interest and movement, which can make a small kitchen feel more dynamic.
Herringbone works best with 6- to 9-inch wide planks or 3×12-inch tiles. Wider planks can look clunky in a small space. Installation is more labor-intensive, figure on 50-75% longer install time compared to straight planks, so professional installation often makes sense unless someone is confident with precise measurements and cutting.
One caution: busy patterns can overwhelm a tiny kitchen. If the cabinets, backsplash, or countertops are already visually complex, a herringbone floor might be too much. In that case, a simpler diagonal run or even straight planks in a pale tone creates a more restful backdrop.
Grout color matters, too. For herringbone tile, matching the grout closely to the tile color keeps the pattern from looking too busy. High-contrast grout (like black grout with white tile) emphasizes every line, which can make the floor the loudest element in the room.
Durable and Low-Maintenance Materials for High-Traffic Kitchens
Small kitchens concentrate wear and tear in a tight footprint. Flooring needs to handle spills, dropped knives, chair scrapes, and constant foot traffic without showing damage quickly. Not all materials hold up equally well.
Porcelain tile is one of the most durable options. It’s denser and less porous than ceramic, with a water absorption rate below 0.5% (compared to ceramic’s 3-7%). That makes it highly stain-resistant and suitable for kitchens. Look for a PEI rating of 3 or higher, this measures abrasion resistance. PEI 4 or 5 is ideal for high-traffic residential areas.
One downside: tile is hard and cold underfoot. Dropped dishes are more likely to shatter. Some homeowners install electric radiant heat mats under tile during installation for warmth, which adds $5-$15 per square foot depending on system and labor.
Luxury vinyl plank (SPC core) is nearly as tough as tile but softer underfoot. The stone-plastic composite core resists dents from dropped objects and doesn’t scratch as easily as laminate. Most quality SPC flooring carries a residential warranty of 15-25 years and a commercial warranty of 5-10 years, which speaks to its durability.
Engineered hardwood can work in kitchens, but it requires more caution. Unlike solid hardwood (which swells and warps with moisture), engineered wood has a plywood core that’s more dimensionally stable. Still, standing water will damage it. If someone wants the warmth of wood but needs durability, site-finished engineered oak with a waterborne polyurethane finish is one of the tougher natural options. Expect $6-$12 per square foot installed.
Concrete (polished or stained) is gaining traction in modern kitchens. It’s incredibly durable, can be tinted any color, and works well with radiant heat. It does require sealing every 1-3 years to prevent staining, and any cracks need repair. Polished concrete is also slippery when wet, so a honed or lightly textured finish is safer in kitchens.
For maintenance, stick with pH-neutral cleaners. Acidic cleaners (vinegar, lemon) can etch natural stone and some tiles. Avoid steam mops on LVP, excessive heat can loosen adhesive or warp planks over time. A damp mop and mild detergent handles 99% of kitchen floor messes.
Conclusion
Small kitchens don’t need to settle for boring floors. Light colors, large-format tiles, and smart patterns all help stretch visual space without sacrificing durability. Whether someone chooses waterproof vinyl for a DIY weekend project or invests in porcelain for long-term toughness, the key is matching material to lifestyle and prep work. Measure twice, level the subfloor, and don’t skip acclimation time. The right floor makes a compact kitchen feel open, functional, and built to last.